


DIY Tent Footprint (MYOG): How to Make Your Own and Attach It to the Poles
A DIY tent footprint fits your tent exactly and weighs a fraction of the manufacturer's version. With reinforced corners and a loop of shock cord, you hook it onto the tent poles, just like a manufacturer footprint. What a footprint does and when you need one is covered in our article What Is a Tent Footprint?.
What you need
Film: for example the XFOIL groundsheet in 1.6 × 2.4 m
Fabric-reinforced tape: one piece per corner
Round plastic discs: one per corner, about 2 cm (3/4 in) across, cut from food packaging such as a cheese package
Shock cord: a short piece per corner
Tools: scissors, a marker and something pointed to punch a hole

Step 1: Measure
The easiest way is to pitch the inner tent on the film laid out flat and trace the outline of the tent floor. Mark where the pole tips sit as well. Alternatively, measure the tent floor. Many tent floors are not rectangular but narrower at the foot end, so measure both ends.
Step 2: Cut
Cut an inch or two inside the line on every side. The footprint has to be smaller than the tent floor, otherwise rain runs off the rainfly onto it and collects under the tent. Only at the corners does the film reach out to the pole tips, because that is where the attachment goes.
Step 3: Plan for the vestibule
If you want your pack and shoes to stay clean in the vestibule, leave a tongue of film on that side. It has to end inside the edge of the rainfly. Measure how far the vestibule reaches with the tent pitched and subtract an inch or two. If you want to save weight, leave the tongue off.
Step 4: Place the disc on the corner
Lay the plastic disc on the corner of the film. It spreads the pull of the shock cord over a larger area, so the film does not tear at this point.

Step 5: Tape over it
Stick a piece of fabric-reinforced tape over the disc. It should overlap the disc generously on all sides and stick firmly to the film. Press it down well.

Step 6: Punch a hole
Use the tip of your scissors or a knife to punch through the tape, disc and film in the center. Widen the hole until the shock cord fits through doubled.
Step 7: Thread the shock cord
Tie the shock cord into a loop and pull it through the hole. The knot sits on the side with the tape and disc and cannot slip through.
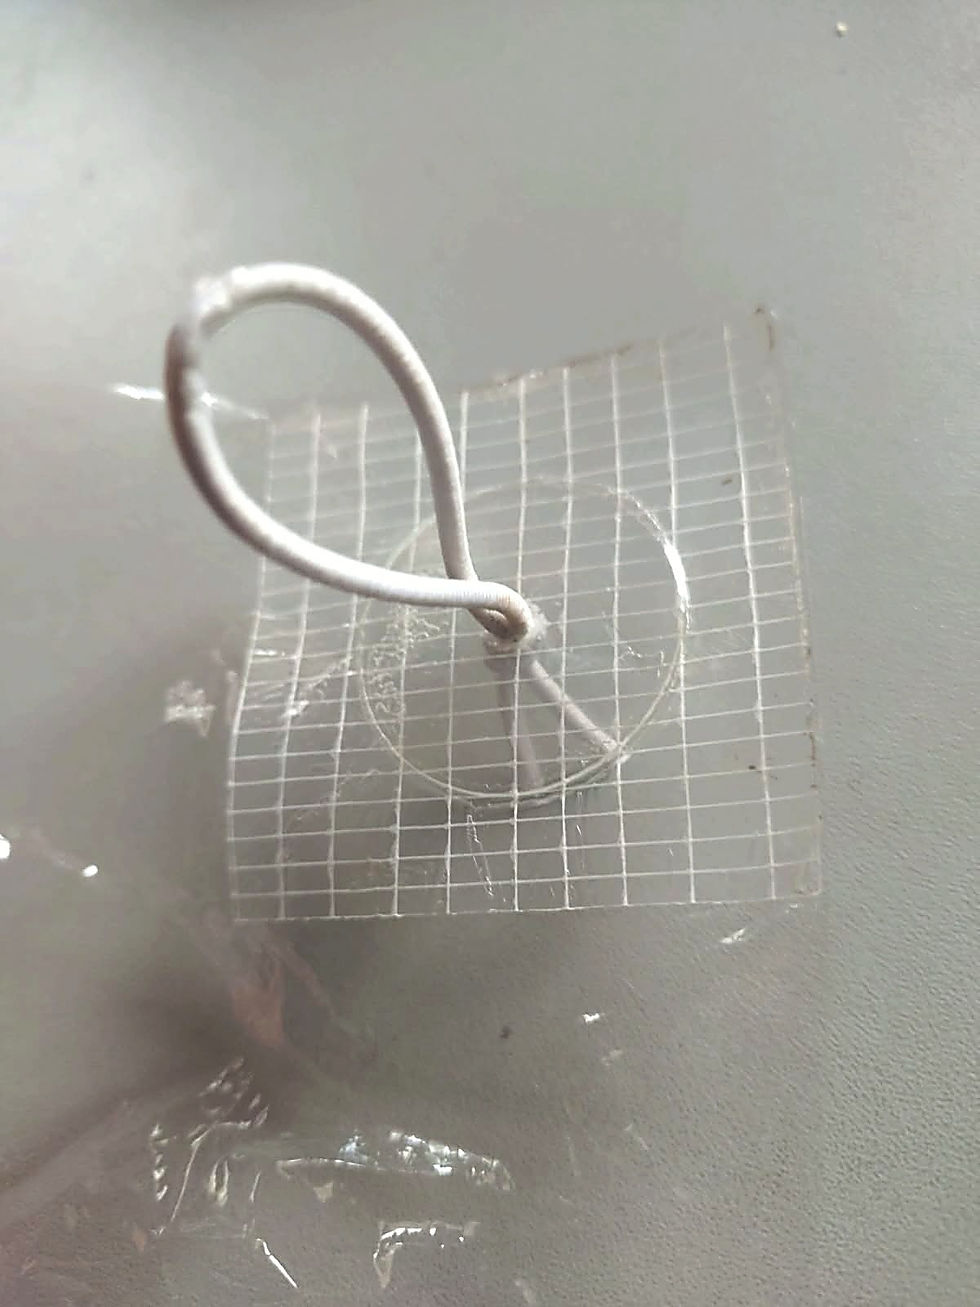
Step 8: Hook it onto the poles
When you pitch the tent, put the loop at each corner over the pole tip, together with the tent's grommet. This keeps the footprint in place under the tent, and the shock cord makes up for small differences in size.

Tips
Build one corner first: Try out the length of the loop on one corner before you build the others.
Keep the loop short: The shock cord should be under slight tension, so the footprint lies flat.
Pack them together: The footprint can stay attached to the tent when both are dry. If it is wet or dirty, pack it separately.
Repairs on the trail: A piece of tape in your pack is enough for small holes. Our tape guide has more on that.
How much does it weigh?
For a tent floor of 130 × 216 cm (51 × 85 in), the film weighs about 51 g (1.8 oz), calculated from 18 g/m². Add four corners with tape, disc and shock cord.
Frequently asked questions
How big should a DIY tent footprint be? An inch or two smaller than the tent floor on each side.
What material works best? A thin, waterproof film. It cuts easily with scissors and does not fray.
Does the corner hold without a grommet? Yes. The disc and the fabric-reinforced tape spread the pull.
Does this work for guy points on a tarp too? Not in the same way. There, the film needs tape on both sides. Our article on attaching guy points shows how.


Thanks, that helps. $40 is just too much for me,especially considering how heavy it is. And I can also use this thing as an emergency tarp, and as a groundsheet for cowboy camping.